Product Setup
⇐ Table of Contents#System Administrator's Guide{{#if: Implementation| | Implementation }}{{#if: | | [[{{{3}}}]] }}{{#if: | | [[{{{4}}}]] }}{{#if: | | [[{{{5}}}]] }} | Product Setup{{#if: Resource Setup| | Resource Setup }} ⇒
Before you can create orders and invoices in ADempiere, the product and price lists have to be setup properly.
Product Setup Workflow
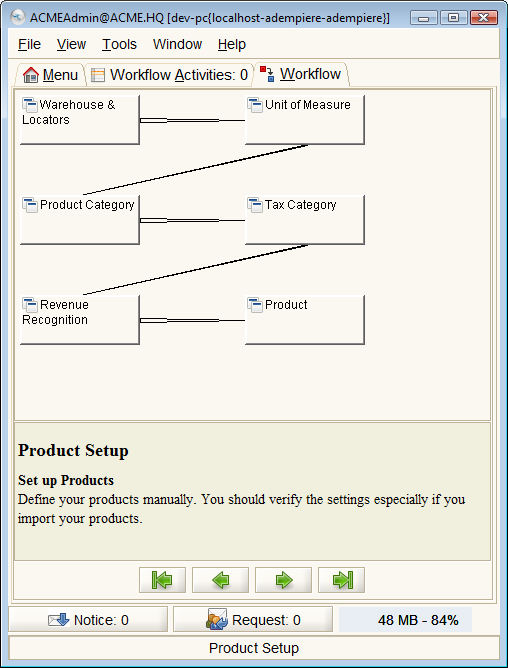
To setup the products, navigate the menu tree to Material Management{{#if: Material Management Rules | » Material Management Rules }}{{#if: | » }}{{#if: | » }}{{#if: | » }} and click on ![]() Product Setup. The following Workflow will appear in the Workflow tab.
Product Setup. The following Workflow will appear in the Workflow tab.
Before you can define products, you will need to work through the following windows:
- {{#if: Warehouse & Locators|Warehouse & Locators|WarehouseLocators }} Window - The Warehouse and Locators Window defines each Warehouse, any Locators for that Warehouse and the Accounting parameters to be used for inventory in that Warehouse. The locators are used in the Locator field. The key value used in defining the locator will be used to identify it. If you do not define a key value, ADempiere will create one using the other field values. For more on Warehouses, see Warehouse Setup.
- {{#if: Unit Of Measure|Unit Of Measure|UnitofMeasure }} Window - The Unit of Measure Window is used to define non monetary units of measure. It also defines if conversion between units of measure are allowed and how they are to be performed. The system provides some automatic conversions between units of measures (e.g. minute, hour, day, working day, etc.) if they are not explicitly defined here. Conversions need to be direct (i.e. if you have only a conversion between A-B and B-C, the system cannot convert A-C, you need to define it explicitly).
- {{#if: Product Category|Product Category|ProductCategory }} Window - The Product Category allows you to define different groups of products. These groups can be used in generating Price Lists, defining margins and for easily assigning different accounting parameters for products.
- {{#if: Tax Category|Tax Category|TaxCategory }} Window - The Tax Category Window is used to enter and maintain Tax Categories. Each product is associated with a tax category which facilitates reacting changing tax rates. Note that there is more to configuring taxes than creating tax categories.
- {{#if: Revenue Recognition|Revenue Recognition|RevenueRecognition }} Window - The Revenue Recognition Window defines the intervals at which revenue will be recognized. Alternatively, the revenue recognition may be linked to service levels provided. Note that functionality that will automatically recognize deferred revenue has not been developed. Deferred revenue must still be manually "recognized" by a GL Journal entry.
- {{#if: |{{{2}}}|Product }} Window - The Product Window defines all products used by an organization. These products include those sold to customers, used in the manufacture of products sold to customers and products purchased by an organization.
Not included in the product setup is the definition of Product Attributes. If you require attributes for products, like sizes or colour, it would help to define these before you define the products that use them. (You can create the attributes later, but it will help with the initial inventory counts if the attributes were defined prior to adding any product to inventory.) To create attributes, navigate the menu tree to Material Management{{#if: Product Attributes | » Product Attributes }}{{#if: | » }}{{#if: | » }}{{#if: | » }} and create the necessary attributes and attribute sets. Attributes can include lot numbers and serial numbers if required.
In defining the products, pay particular attention to the following fields:
- Stocked - if selected, the product will be considered in inventory and every transaction will include accounting consequences involving inventory movements.
- Purchased - if not selected, the product will not be available for purchase on a vendor purchase order or invoice.
- Sold - if not selected, the product will not be available for sale on a customer order or invoice.
- Current Cost Price (on the {{#if: |{{{3}}}|Costs }} Tab) - if the product is stocked, ensure you record the product cost here.
Importing Products
Prepare for the product import process by gathering as much information as possible about the products.
Adding Model Validators to the Import Process
The Product Import process will trigger user-supplied model validator code or scripts at the following times in the import process:
- Import table - ImportValidator.TIMING_BEFORE_VALIDATE - the raw data is available in the I_Product table and no further pre-processing (validation) has occurred. A validator can be used here to further format the product data prior to the validation process.
- Import table - TIMING_AFTER_VALIDATE - the model validator is triggered after the initial validation has been performed by the software. Existing _ID values will have been found and the fields referred to above will have been fixed. The model validator can be used to extend the validation logic prior to importing the data into the Product table.
- Product table - TIMING_AFTER_IMPORT - this trigger occurs after the data has been imported into the product table model but before the save of the record. The validator can add additional data not included in the import process or adjust the data to ensure the "save" operation will complete successfully.
- Price table - ImportValidator.TIMING_AFTER_IMPORT - triggered after price list data has been imported into the Product Price model but before the save.
