Difference between revisions of "A Step by Step Guide to Data Migration with Talend ETL"
m |
m (→Case 2: Complex Data Import - Business Partners) |
||
| Line 171: | Line 171: | ||
'''Steps:''' | '''Steps:''' | ||
| − | [[File:MBPartner.jpg| | + | [[File:MBPartner.jpg|500px]] |
== Case 3: Document Import with DocAction - Import and Complete Sales Order == | == Case 3: Document Import with DocAction - Import and Complete Sales Order == | ||
== Case 4: Logging Unsuccessful Imports == | == Case 4: Logging Unsuccessful Imports == | ||
Revision as of 10:09, 28 May 2012

Note: DISCLAIMER - This is an implementation guide written by Kittiu, from ecosoft Bangkok, Thailand. It is not an official guide nor meant to be comprehensive yet. Other contributors are welcome to discuss on improving it.
Status: Draft
Contents
Overview
In ERP Implementation, one of the major activity is Data Migration. This task is no doubt, tedious and time consuming, and no one want to work on it. I have been looking for tools to help in this task since I start working with ADempiere, I.e., Excel, ADempiere's Data Import Tools, or even 2Pack. And yes, we provide templates and hoping the customers will fill them in correctly, so that we can load them using ADempiere's Data Import Tools. But in reality, most data from customers are far from usable. And most of the time, we need to modify or rewrite the whole import process by ourselves.
I have been thinking about tools like ETL (i.e., Pentaho Kettle, etc.) to ease the process for a while. While most use case, are direct import to tables. Without ability to call ADempiere API to importing data is not very useful.
Until very recently, I just found that Talend has been used for ADempiere with ability to call ADempiere API some time back at Talend Open Studio. Later is better than never. So far, it is the best tools to work with ADempiere I have found. And in this article, I will try to help explaining how to use Talend with Adempiere in a bit more detail.
Start with Talend and ADempiere
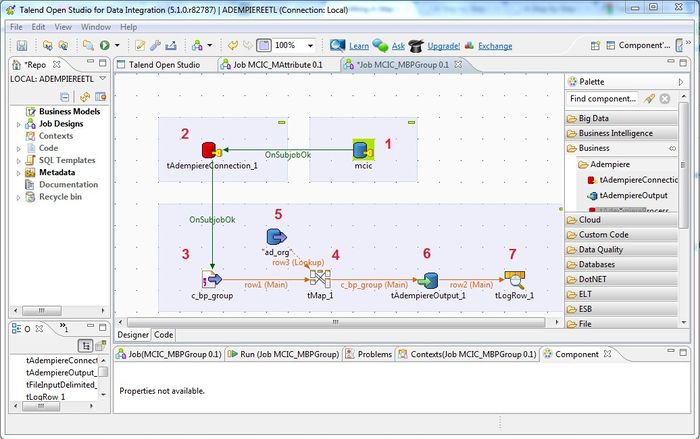
The good thing about Talend that make it useful for our cases (ADempiere), is ability to write ADempiere Connector and Import Components. Following picture depict the overview of how it will work for you,
Following will briefly discuss how it works
- Initialize database connection
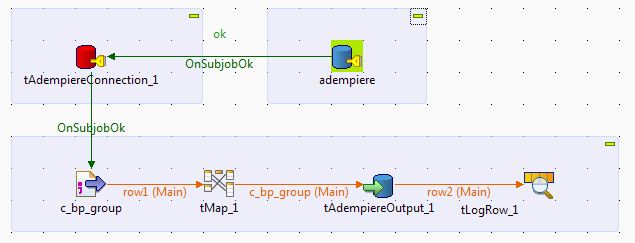
- Login to Adempiere using tAdempiereConnection component to receive ADempiere Context (i.e., Env.getCtx()). Now, we considered Logged In. This will also trigger the main import subjob.
- This component will will initialize Delimited File (point to local csv file), read the file and send columns and data (row by row) to to tMap component
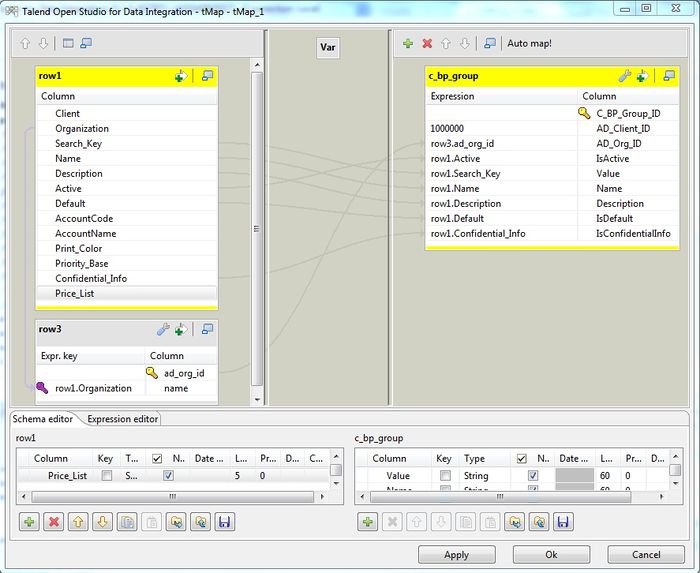
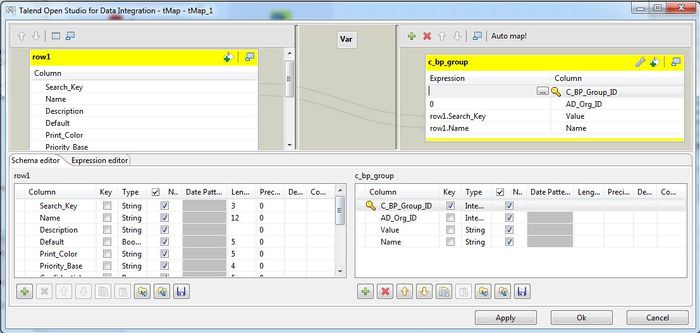
- tMap component (the following picture), will map the input schema to the output schema. We can use expression to modify / filter / lookup data before sending to output.
- Provide lookup to other table, in this case, we have Org Name and we want to lookup for AD_Org_ID.
- Output data will be mapped to Adempiere's Model using tAdempiereOutput component. As you can guess, data will be created using Adempiere's API (i.e., object.save()).
- Just for information, the tLogRow_1 will display the raw output data.
Now, if you are convinced that Talend can help your project, we can move on (if not, and you have better solution, please let me know too. :).
Before continue reading, I recommend you to read the following list of articles. In this tutorial, I will not go into details of why I am doing the way I am doing, but rather provide you with useful examples.
- Download and install Talend Open Studio for Data Integration -- http://www.talend.com/products/open-studio-di.php
- Quick study about Talend -- http://www.talendforge.org/tutorials/menu.php
- You can lean as much here, but at least please finish the 5mn Demo - Talend Open Studio for Data Integration Overview
- Understand the concept of new component creation -- http://powerupbi.com/talend/componentCreation_index.html
- Per say, the advantage of using Talend is about integration with Adempiere, as such, this article is critical for you to be able to know how it works and how to debug if face problem.
Setup Talend for ADempiere
Note: You can also refer to Talend Open Studio as the original document.
- Provide Adempiere core libraries
- Copy ADEMPIERE_HOME/lib/Adempiere.jar and ADEMPIERE_HOME/lib/CCTools.jar to TOS_HOME/lib/java
- Note: For customization.jar or other additional library, you can put it here as well. But be remembered that we will have to tell about it in the next Optional step.
- Install Adempiere Talend's components
- Download the Adempiere components Media:Adempiere_talend_0.2.zip
- Extract components (tAdempiereXXX) and put it in any directory, i.e., TOS_HOME/custom_components
- Point TOS to the directory containing the components.
- Open TOS, > Window > Preferences, in tree, > Talend > Components
- Update field "User component folder:" to your custom_component folder.
- Apply the change. Now, if you create new job, you should now see Adempiere components in the Palette area under Business > Adempiere
- (Optional), if you also installed customization.jar, make sure your Adempiere components know about it.
- With TOS, > Window > Perspectives > Component's Designer
- You should see 3 Adempiere components here, tAdempiereConnection, tAdempiereProcess, tAdempiereOutput. Each component will have a config file (tAdempiereXXX_java.xml).
- Add new line for your customiizatoin.jar in <CODEGENERATION> part.
	<CODEGENERATION>
		<IMPORTS>
			<IMPORT NAME="Adempiere" MODULE="Adempiere.jar" REQUIRED="true" />
			<IMPORT NAME="Adempiere Libraries" MODULE="CCTools.jar" REQUIRED="true" />
			<IMPORT NAME="Customization" MODULE="customization.jar" REQUIRED="true" />
		</IMPORTS>
	</CODEGENERATION>
- Install Samples, for samples job discussed in this tutorial.
- Download the sample jobs Media:Adempiere_talend_example.zip
- Switch back to perspective "Integration", on "Job Design" not, right click and "Import Items"
- Select archive file to import.
- The Component's Designer View
- ???
- ???
Data Migration Use Cases
Now as the environment setup is ready, and you have some knowledge about Talend ETL, now we are ready to explore how it works with Adempiere. The first case, will be a bit in detailed, but will be more conceptual as we move on.
Case 1: Simple Data Import - Business Partner Group
In this case, we will learn how to import data into 1 table. I.e., Business Partner Group. Though it is a simple case, you will see how other data, in this case, Accounting tab will be created as well. And at the end, we will elaborate it a bit, by look up to other table for ID instead hard code the ID.
Source Data: c_bp_group.csv
"Search Key";Name;Description;Default;"Print Color";"Priority Base";"Confidential Info";"Price List";"Purchase Pricelist";"Discount Schema";"PO Discount Schema";"Credit Watch %";"Price Match Tolerance";Dunning
RTS;Retailers;;false;Black;Same;false;Standard;;;;0;0;Default
WHS;"Whole seller";;false;Black;Same;false;Standard;;;;0;0;Default
Steps:
- Create new job named "MBPGroup", click finish.
- Double click on the new job to open the canvas.
- Create database connection to adempiere (postgres)
- On the left panel, > Metadata > Db Connections, right click > Create Connection
- Create new connection named "adempiere", click next.
- DB Type: "PostgreSQL", fill in all information, Login, Password, Server, Port, Database (i.e., adempiere), Schema (adempeire)
- Click check button, it should show connection successful. Click finish.
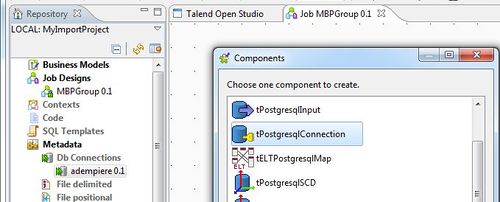
- Drag the newly created connection, i.e., adempeire, to the canvas.
- Choose to create component as "tPostgresqlConnection"
- Create adempeire connection
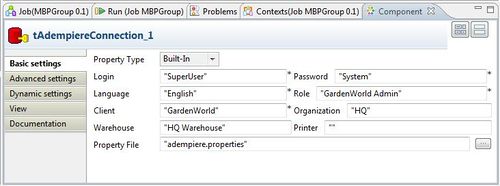
- From the right palette, drag component "tAdempiereConnection" into the canvas
- Double click on the icon, you will see component properties in below panel. Fill in Adempiere connection as following,
- Test Adempiere Connection
- Connect database connection with tAdempiereConnection, right click on "adempiere" (db connection) > Trigger > On Subjob OK, and drag it to tAdempiereConnection_1
- On the Run tab, click Run, if connection is valid, it should show no exception error.
- Create source file connector (c_bp_group.csv)
- On the left panel, > File delimited, right click > Create file delimited
- Create new delimited file named "c_bp_group", click next.
- Browse to select file c_bp_group.csv, click next.
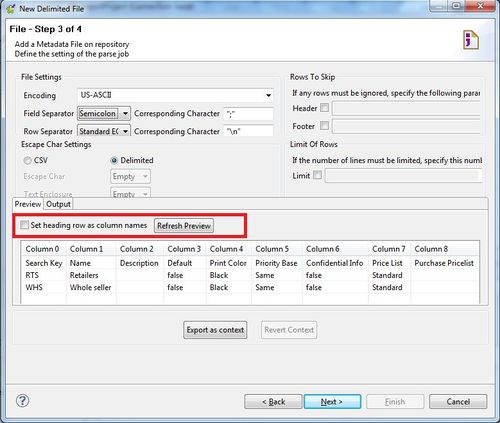
- This step will allow you to configure how it read the source file. I.e., check "Set heading row as column name" and click Refresh Preview.
- Click next, it will show the final metadata for c_bp_group, click finish to create the file connector.
- Drag the newly created file connector, c_bp_group, to the canvas.
- Choose to create component as "tFileInputDelimited".
- Connect data from source data to Adempiere
- Drag following components from palette to canvas
- tMap: this component will be used to map data between input source file and output Adempiere Model
- tAdempiereOutput_1: this component represent Adempiere model.
- tLogRow_1: this is optional, but will be useful to display log of data row.
- Connect each component together as in following picture.
- From tAdempeireConnection_1 to c_bp_group file connector, use On Subjob OK trigger
- From c_bp_group to tMap_1, simply connect.
- From tMap_1 to tAdempiereOutput_1, name the output "c_bp_group"
- From tAdempiereOutput_1 to tLogRow_1, simply connect.
- Drag following components from palette to canvas
- Configure tAdempiereOutput to import data with MBPGroup model,
- Click on tAdempiereOutput_1, it will open the component properties.
- Set Adempiere model class name: org.compiere.model.MBPGroup
- As we are going to insert new data (not update), leave Insert Mode checked.
- Important step, map input data to output model
- Double click on tMap_1 component, tMap window will appear.
- You will notice that now we have a table (column schema) on the left ready, but on the right only empty "c_bp_group" output table. We will have to define what we want to map to MBPGroup model.
- For "c_bp_group", add the column that match with ADempiere column names,
- Map column from the left to table on the right. For simplicity, we will hardcode AD_Org_ID to 0.
- Click Finish to close the window. If you are asked to "Propagate the changes", click Yes. This will make sure that the new c_bp_group's schema is synchronized to tAdempiereOutput_1 and tLogRow_1.
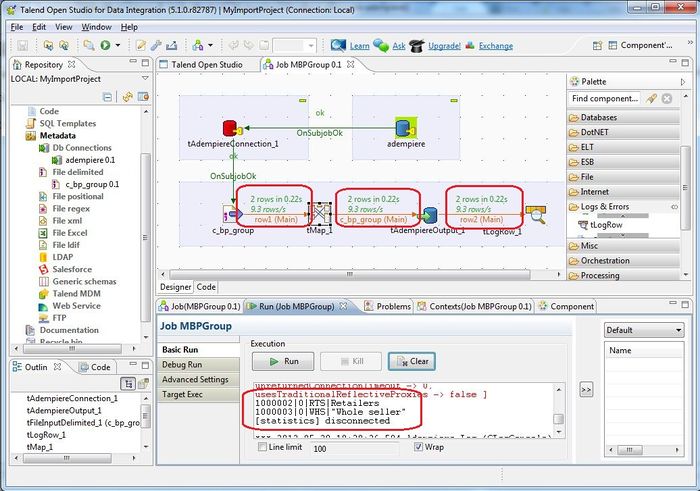
Now we are ready to import data. Make sure that, we do not have the importing data in BPartner Group window yet. And if ready, click Run button.
You will see the data being transferred from source file to Adempiere in real time.
Case 2: Complex Data Import - Business Partners
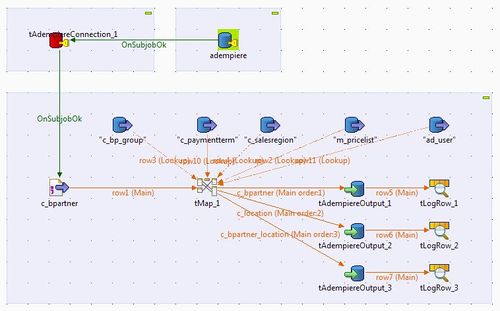
Most data model are not as simple as in the first example. Give business partners for instance. Creating business partner consist of creating data in multiple tables, i.e., C_BPartner + C_BPartner_Acct + C_Location + C_BPartner_Location + AD_User. And these data will be created with the relation to one another, i.e., C_BPartner_Location is created with the foreign key C_BPartner_ID & C_Location_ID created before hand. And to make life a bit more complex, lets exclude Business Partner from BP Group "Wholesales".
Source Data: c_bpartner.csv
Client;Organisation;Search Key;Name;Name 2;Description;Credit Status;Tax ID;Tax Group;Business Partner Group;Customer;Invoice Rule (D=After Delivery);Delivery Rule (A=Availability);Delivery Via (D=Delivery);Price List;Payment Rule;Payment Term;Sales Region;Sales Representative;Credit Limit;Partner Location;Address 1;Address 2;Address 3;Address 4;City;ZIP;Country;C_Country_ID;Ship Address;Invoice Address;Phone;2nd Phone;Fax
GardenWorld;HQ;CUS1001;SONY CO.,LTD.;;;;             ;;Retailers;TRUE;D;A;D;Standard;S;Immediate;East;GardenAdmin;0;Office;2322 Wall Street;Central City;;;Florida;23110;Thailand;319;TRUE;TRUE;9877687817;;877899998
GardenWorld;HQ;CUS1002;CP Co.,Ltd.;;;;;;Retailers;TRUE;D;A;D;Standard;S;30 Net;East;GardenAdmin;2000000;Factory;5765 Hia Jieng Road;Hua Him;Thien 2,Ward Tan Phong;District 7;Thianjin;12321;Vietnam;340;TRUE;TRUE;0986799719, 998991822;;998877766
GardenWorld;HQ;CUS1003;Ecosoft Co., Ltd.;;;;;;Retailers;TRUE;D;A;D;Standard;S;Immediate;West;GardenAdmin;0;Factory;76/98 Naratiwas Rd.;Sathorn;CENTRE#06-05;;Bangkok;33212;Singapore;300;TRUE;TRUE;6596192189;;291181812
GardenWorld;HQ;CUS1004;P&G Co., Ltd.;;;;;;Wholesales;TRUE;D;A;D;Standard;S;31 Net;West;GardenAdmin;500000;Office;889 Empire Tower;Yanawa;;;Bangkok;10120;Thailand;319;TRUE;TRUE;6756255-8,01 8272366;;987766121
Steps:
